Tools and Sundries
Back to: Installing a Parrot Interactive LED on a surface
As a Technical installation Team or Technician you have a whole arsenal of tools at hand. But do you have the correct tools to mount an LED?
The Parrot Interactive LED range does carry a bit of weight that it can throw around and below are the actual LED weights that you could use to plan or formulate a solution to your Sales Representatives. This will also assist in Team Needs as Health and Safety is always the highest priority.
Net Weight / Gross Weight
65″ – 43KG / 57KG
75″ – 57KG / 77KG
86″ – 72KG / 96KG
**It is advised that the surface you are installing on can carry 4 times the weight of the LED being installed as per the above wieghts.
As you can note from the above, firstly and most importantly, always have an assistant to assist with carrying the actual stock and installation as it will be very difficult trying to lift and mount these screens as a “One man band”.
Tools:
The tools required to install this solution is quite simple and easy to carry around:
- Drill
- The requirement of drills would be one strong enough to go into a concrete substrate. This would be one of the hardest surfaces to penetrate.
- A normal household drill will suffice but will not last very long so a stronger drill is advised with a hammer action function
- Drill bits
- Depending on the substrate you use different drill bits – The following is the guide to Concrete, bricks or other hard surfaces (This does not include Drywall and mobile containers. This will be discussed later on in the course)
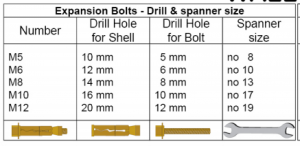
- M8 Expansion bolts need a size 14 (14mm) concrete drill bit
- See the below chart with different Expansion bolt sizes and the required bits.
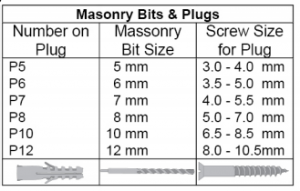
- 6mm Concrete drill bit – for the cable trunk.
- Depending on the substrate you use different drill bits – The following is the guide to Concrete, bricks or other hard surfaces (This does not include Drywall and mobile containers. This will be discussed later on in the course)
- 13mm Spanner or socket wrench (This is for the M8 Expansion bolt used)
- Phillips Screwdriver set (Medium and Big)
- In some cases an Allen key set.
- Spirit Level – 1m to 2m spirit levels are more accurate than smaller ones.
- Measuring tape
- Hammer
Sundries:
In all cases the bracket that comes with the Interactive LED does have bolts accompanying it and the LED itself has the necessary screws to mount the back brackets. But we always recommend you keep the following sundries with you so that you may increase productivity and time efficiency when installing.
- M8 Expansion bolts(Chart above)
- As mentioned above the AL5000 Wall mount bracket does come with a set of 6 expansion bolts. We vary rarely use these as the sheathing of the expansion bolt does not grip very well in softer walls and bricks. A M8 Expansion bolt is much more reliable and slightly longer to ensure that your customer can work with the LED to hearts content.
- Now the above mentioned statement does not mean that you cannot or must not use the bolts included, we recommend using the proper M8’s as the best installation method.
- 6mm Fisher plugs and screws(see drill chart below) – This is for the cable trunk.
- Insolation tape – preferably the Nitto tape as it has more flexibility to it.
- Cable ties – To assist with the neatness of the cables
- Plug tops – In the event that something happens with the Plug of the LED.
Drywalling and Mobile containers:
This is a completely different ballgame. When we get to these to surfaces we move forward with caution. Thy do I say this? Because these two are not solid walling or surfaces, they can wear down over time, the mounting holes might expand from daily usage and in the end may result in the LED falling from the surface causing possible injury to the user. Thus we have the following guidelines:
Non re enforced Drywall:
We recommend to never install a LED solution on this surface. As the downward force might be strong enough to carry the weight, it will not last very long as users will be interacting, moving and touching the screen, eventually wearing out the holes keeping the brackets in place. So be very sure before installing this surface. We have alternatives as mentioned previously that could still facilitate the installation to move forward by using the stand. You can now also see the importance of a site visit and pre installation check sheet.
**The LED brackets themselves allow for 20cm to 40cm opening / swing mechanism for maintenance. This then removes downforce to an angled downward force. By maintaining the screen the brackets have a high likelihood of tearing out of the Drywall if is not re-enforced.
Re Enforced Drywall and container walls:
In the event where the customer confirms that it is double or re enforced drywall the tools and sundry list changes slightly. The same will apply with the drill and screw drivers but there will be a difference in what screws are used. Our recommendation on drywall re enforcement that works the best and is secure enough to install on:
Re-Enforcement
What we usually recommend and have done at our offices is to use 2 X 16mm thick MDF sheets that are mounted next to each other the width of the LED at minimum behind the Drywall in the space where you are aiming to install the LED. In essence this will then mean that you are drilling through the Drywall and the wood to mount, to ensure that the holes cannot incur wear and tear and carrying the weight of the LED.
Below is the list of sundries and screws that will change.
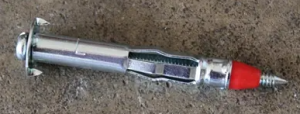
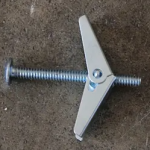
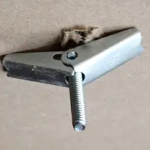
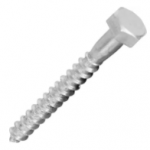
- Butterfly screws biggest sizes round about 8mm to 10 mm (also known as a Toggle Bolt) and or expansion drywall screws 8mm to 10 mm(also known as a molly bolt) (a picture shown below) or Coach screws(M8 size to M10) if you know that it has a wooden backing.
- Metal detector to find the exact space of the re enforcement
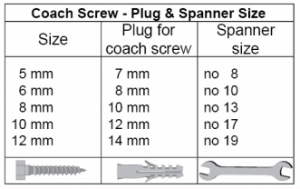
- Steel drill bit set (Depending on the screws and bolts you use the required size as per the size chart below). In the case of the Molly bolt you will use the same diameter drill bit as the actual Molly Bolt
- 6mm Drywall screws for the cable trunk
Illustrated here is the different bolts and screws as described above:
Molly Bolt

Toggle Bolt
Coach Screw
Sizing guide
*I must head the warning again – be very accurate and sure if the Drywall is re-enforced and possibly draw up a liability form that your customer can sign should they insist on installing on a Drywall. This is not only to protect the company it is in place to protect the installation technicians. You can at any point upon visiting the site yourself decide if the wall is strong enough to carry the weight.
