Tools and Sundries
Back to: Installing / mounting a Parrot Interactive LED on a Stand
As a Technical installation Team or Technician you have a whole arsenal of tools at hand. But do you have the correct tools to mount an LED on a stand?
The Parrot Interactive LED range does carry a bit of weight that it can throw around and below are the actual LED weights that you could use to plan or formulate a solution to your Sales Representatives. This will also assist in Team Needs as Health and Safety is always the highest priority.
Net Weight / Gross Weight
65″ – 43KG / 57KG
75″ – 57KG / 77KG
86″ – 72KG / 96KG
**The IW7101 stand has a maximum carry weight of 136.4Kg
Stand weight specifications and manual.
The stand as stated above can carry the following weight:
- Maximum carry weight – 136.4Kg
- AV shelf max load – 13.6Kg
- Video tray max load – 4.5Kg
The Assembly and Specification sheet below:
IW7101 – Interactive Touch Panel Stand Part 1
IW7101 – Interactive Touch Panel Stand Part 2
As you can note from the above, firstly and most importantly, always have an assistant to assist with carrying the actual stock and installation as it will be very difficult trying to lift and mount these screens as a “One man band”.
Tools:
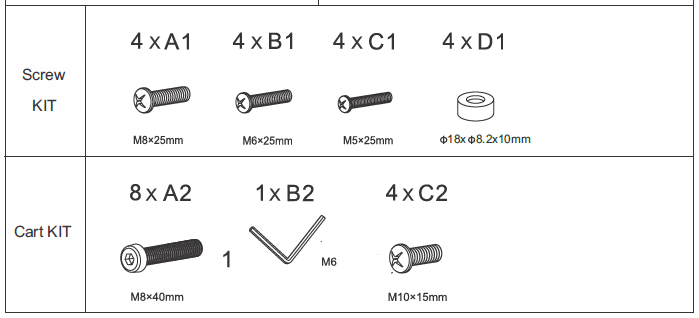
There aren’t many tools required to install the IW7101 stand. Most of the tools and fasteners are included in the packaging, this will be indicated below:
- M6 Hex Wrench / Allen key
- This should be included in the packaging
- With this figure you will see the included bolts and fasteners
- Phillips screw driver set
- Measuring tape
- Shifting spanner and/or Spanner set
- Have a spare Allen Key set
Sundries:
In all cases the Stand kit does have bolts accompanying it and the LED itself has the necessary screws to mount the back brackets. But we always recommend you keep the following sundries with you so that you may increase productivity and time efficiency when installing.
- Insolation tape – preferably the Nitto tape as it has more flexibility to it.
- Cable ties – To assist with the neatness of the cables
- Plug tops – In the event that something happens with the Plug of the LED.

